
Monday, December 13, 2010
Monday Devotion in 1 John
I love 1 John, it's a convicting book of the Bible, but one that is sure to illuminate hearts. For this "Monday Meditation" I wanted to share a few verses from 1 John that I read in my devotions the other day. I pray they're a blessing and cause us to really meditate on them.
1 John 1:8 ¶ If we say that we have no sin, we deceive ourselves, and the truth is not in us.
9 If we confess our sins, he is faithful and just to forgive us our sins, and to cleanse us from all unrighteousness.
10 If we say that we have not sinned, we make him a liar, and his word is not in us.
2:1 ¶ My little children, these things write I unto you, that ye sin not. And if any man sin, we have an advocate with the Father, Jesus Christ the righteous:
2 And he is the propitiation for our sins: and not for ours only, but also for the sins of the whole world.
There are so many people who have a hard time truly being honest with themselves and in humility, seeing themselves for the sinner that they are. The Bible says that all have sinned, but if we confess our sin, Jesus Christ is faithful to forgive us!! What a blessed thought!
3 ¶ And hereby we do know that we know him, if we keep his commandments.
4 He that saith, I know him, and keepeth not his commandments, is a liar, and the truth is not in him.
5 But whoso keepeth his word, in him verily is the love of God perfected: hereby know we that we are in him.
6 He that saith he abideth in him ought himself also so to walk, even as he walked.
True salvation changes a person, you have a desire to walk after God, to keep His Word/Commandments, to live holy and set apart unto Him. Why then are so many professing Christians not living this way??
15 Love not the world, neither the things that are in the world. If any man love the world, the love of the Father is not in him.
16 For all that is in the world, the lust of the flesh, and the lust of the eyes, and the pride of life, is not of the Father, but is of the world.
17 And the world passeth away, and the lust thereof: but he that doeth the will of God abideth for ever.
Sobering verses, but crucial to prove our life by. Does our life match up to the Bible? If not, why not? Is there sin in our life? Have we ever truly experienced the forgiveness of sins? I challenge you to meditate on these verses and draw nigh unto God.
Happy Monday, Everyone!
~Lauren


Friday, December 10, 2010
Festive Fabric Flower

If you can't tell by now...We LoOove Fabric Flowers! Today, I am going to show how to make this fun and festive flower headband! Make it for yourself to wear or make it as a last minute Christmas gift!
I am using this gorgeous silver and red sequined fabric, but any fabric will do. I wanted to use both colors of fabric so I cut a 1 1/2 x 22 inch strip of both fabrics, placed the pretty sides together and sew a 1/2 inch from the edge down the entire length of fabric. The length of fabric you will need will vary depending on what size flower you want, but my strip of fabric measured 2 x 22 inches after I sew the two colors together.


To make this headband you will also need:
* A Hot Glue Gun
* Elastic
* Pipe Cleaners
* Felt

For my flower I twisted the ends of two pipe cleaners together to form a longer pipe cleaner. Begin by hot glueing your fabric strip to the end of the pipe cleaner. Start wrapping your fabric around the pipe cleaner and hot glue in place after a few twists.

Your fabric doesn't have to be wrapped perfectly. In fact, I think the messier the better : ) Keep wrapping and glueing your fabric until you run out of fabric. Cut off the excess pipe cleaner if you have any.

Start at one end and begin twisting the fabric into a spiral. Glue in place ever so often to keep things from untwisting.


After twisting the entire length secure in place with hot glue.

Next I made an elastic headband for the flower.
Cut a piece of felt out that is slightly smaller than your flower.

Stretch your elastic around your head to measure out the fit you want. Cut your elastic to size and place the middle of the elastic in the middle of your felt. Secure the elastic to the felt with a line of stitches. I am using a bright color of thread so you can see where my stitches are place but you should probably use matching thread : )

Now overlap the ends of your elastic and stitch together.

Before gluing the flower to the felt I glued down some ostrich feathers.

All that's left to do is to hot glue your flower onto your felt!

Here is what the back of the headband looks like...

And here is what it looks like on my head! :D

If you decide to make this flower or any other fabric flower we have previously shown you how to make (here), we would LOVE to see it! Send us a pic and we'll put it on the blog!
Hope everyone has a GREAT weekend!
*Jes*
Thursday, December 9, 2010
This week has been great! And I'm so thankful!
Colossians 3:15-16 "And let the peace of God rule in your hearts, to the which also ye are called in one body; and be ye thankful. Let the word of Christ dwell in you richly in all wisdom; teaching and admonishing one another in psalms and hymns and spiritual songs, singing with grace in your hearts to the Lord."
I'm sure that you all have noticed that our blog has been a little less than consistent lately... We have been some busy ladies! : ) I know you all understand!
One of the reasons I have been a little out of the loop lately is because we have just opened a new photography studio!!

Little Awesome Red! ; )
AHHHHHHHHHHHHHHH!!!!!!! I'M SO EXCITED!!!!!!!!!!!!!!!!!! : D
I'll get some pics up of the studio soon... ; )
Needless to say--that is my Thankful Thursday! God has blessed us in so many ways in getting this thing up and running! It's wonderful to see Him answering our prayers. Thank you, Lord!

Me and My Rockin' Sisters
These shots were all test shots with our new lighting... : ) Love my family!

Torturing Little Red... : )
Aren't they great test subjects?
Anyways, just thought I'd give a quick fill in to what's been going on with me lately--and what I am ever so thankful for! : )
I am also thankful for this verse. I love it. Def. one of my top favorites of all time, which I reread today and had to share...
Hebrews 12:28-29 "Wherefore we receiving a kingdom which cannot be moved, let us have grace, whereby we may serve God acceptably with reverence and godly fear: For our God is a consuming fire."
Had to spread the Word! : D
Have a great Thursday and weekend!
~Page
Tuesday, December 7, 2010
Quilled Snowflakes!

To wrap up this Christmas Crafty Creation marathon, I thought I would revisit an older Crafty Creation which you can find HERE. One of my favorite past times is quilling :D In the previous post about quilling, I introduced you to the craft and gave you a basic overview of how to do it. Today, I am going to show you step-by-step instructions on how to quill this BEAUTIFUL snowflake!!!

WAIT!!!! COME BACK!!!! It's not that hard..... I promise : )
I made a color coded pattern of the snowflake so that you could see the individual shapes. You can reference back to this picture if you are having trouble!

First, you need to cut your paper strips to size. I am using 1/8 inch quilling paper. Here are the lengths you need :
6 - 11 inch long strips
6 - 2 inch long strips
6 - 6 inch long strips
18 - 5 inch long strips
Other supplies that you need are tweezers, pins, clear tacky glue, a quilling tool, and a quilling board (optional).

First, grab an 11 inch strip of paper and insert one end into the quilling tool.

Tightly twirl the paper onto the tool.

Take the twirled up paper off of the tool and place it into the 1/2 inch circle on the quilling board. Let the paper expand and fill up the circle. If you do not have a quilling board, let the paper expand in between two fingers until it is about 1/2 inch wide.

Put some tacky glue on the end of the paper and close the circle. I use a pin to apply the tacky glue. Let the glue dry for a few seconds--then, pinch both side of the circle simultaneously to form an 'eye' shape.


Make six of these shapes.

Now grab your 6 inch long strips of paper. Fold each piece in half.

With your quilling tool start at one end and tightly twirl the paper inwards 2/3 of the way down one side. Slide the paper off of your tool and it should look something like this:

Now do the other side and you should end up with an 'open heart' shape. Make six of these shapes.

Put some tacky glue on the tip of an 'eye' shape and place it inside the 'heart' shape. Also glue the twirls of the 'heart' shape to the top sides of the 'eye' shape. The back of quilling boards are usually covered in foam. You can pin your shapes in place why your glue dries. If you do not have a quilling board, get a piece of cardboard or styrofoam and put wax paper on top of it ( so the glue doesn't stick to it) and pin your shapes on place. Glue all six of your 'eye' shapes inside of all 6 of your 'heart' shapes.

Now get your 2 inch strips of paper. Apply glue to 1/2 of one side. Fold the strip in half and let dry on a flat surface.

Now, for your 18 - 5 inch long strips of paper. Twirl a piece tightly onto your tool and DO NOT LET IT UNWIND! Glue the end down, and let the glue dry for a second before removing the tight circle from the tool. Do this with all 18 strips.

Once you have all of your shapes made it's time to form the snowflake!

Glue your 6 heart/eye shape combos together like this :

Glue your 1 inch folded strips of paper between your heart shapes.

Glue 1 tight circle on the tip of each 1 inch strip.

Glue 2 more tight circles below the tip.
(Pin down your shapes to keep them in place while the glue sets if you are having problems keeping things in place. )

Isn't it beautiful! The snowflakes are stronger than they appear to be, but if you want to add some extra strength and protection you can pray some clear / non-yellowing acrylic spray paint on it. Spray a VERY light, thin coat and let dry.

These make beautiful Christmas tree ornaments! You can also attach these to the front of Christmas cards, scrapbook with them, frame them, or hang them from your ceiling!
If you have any questions about the directions feel free to leave your question in the comment section and I'll get back to you as soon as possible!
I hope that you challenge yourself and explore this craft more! Let me know if you want instructions on how to make the 2 other snowflakes and I'll post them!
*Jes*
Monday, December 6, 2010
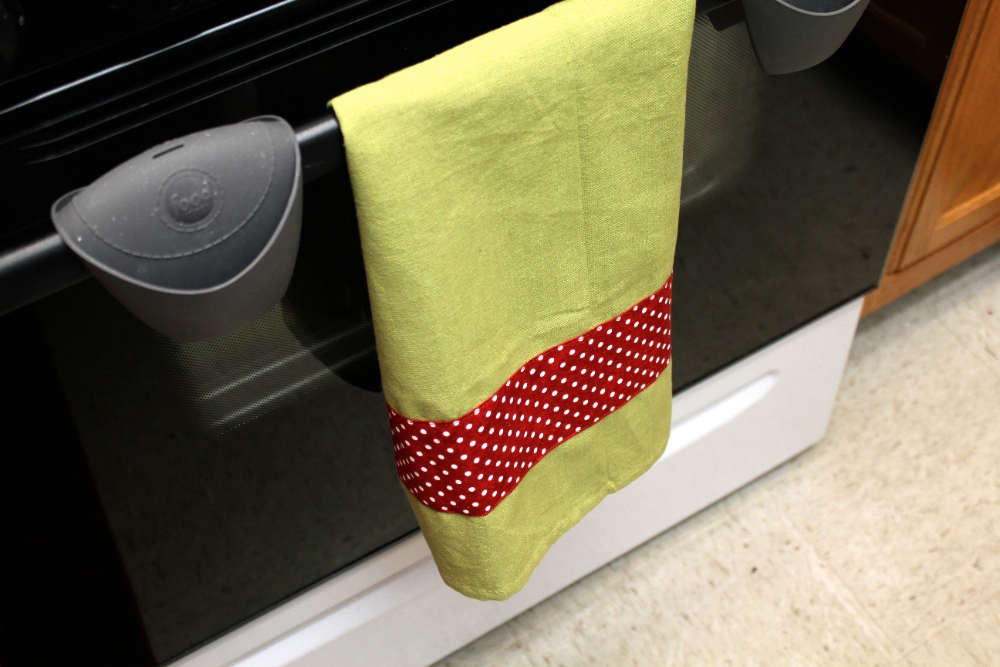
Christmas Dish Towels
This week, I have shown you many different ways to decorate your home for the Holidays. Today, I am going to show you any easy way to add some Christmas flare to your kitchen! Around the holidays, themed hand towels are very popular, but their aren't many options to choose from in the stores, and often I do not like the designs. Making your own decorative hand towels is very easy! This would also make a great gift for a friend this Christmas!
Here's what you'll need :
* A plain hand towel. (I am using a bamboo tea towel, but you can use any type you want.)
* Fabric that goes with whatever look or theme you choose
* Pins
* Sewing Machine
* Iron
* Matching Thread

All I am doing is adding a stripe of fabric across the hand towel, so the first thing you want to do is decide how wide you want your stripe. I wanted my stripe to be 3 inches wide.
Next, measure the width of your towel. Add 1 inch to both of those measurements.
If I want my stripe of fabric to be 3 inches tall and my towel is 18 inches across, I am going to cut my fabric to 4 x 19 inches.

Once you have your fabric cut, you need to iron down a 1/2 inch on each side. One easy way to do this is with no-melt mylar. You can find a sheet of No-Melt Mylar in the quilting section of craft stores. It is basically a sheet of plastic that doesn't melt.

With a ruler and x-acto knife, cut off a strip of the mylar. Make sure that you cut the edge straight.

Place the 'pretty' side of the fabric down and draw a line 1/2 inch from each edge on the back.

Place the edge of the strip of mylar on the line that you drew.

With your iron, fold the fabric over the edge of your mylar strip and iron down.

Iron down both sides of your fabric.

This is just one way to iron down seams. Do what you know and what your comfortable with : )
Now iron down a 1/2 inch seam on both ends of your strip of fabric.

Now your strip of fabric should be the exact length of your towel. Place the strip where you want and pin it to your towel.

Sew all the way around along the edge of the fabric and your finished!


I like having kitchen Christmas decor without it being overly generic!
Tomorrow, we will end our week long marathon of Christmas Crafty Creations with instructions on how to quill one of these beautiful snowflakes so make sure to check in!
*Jes*

Subscribe to:
Posts (Atom)