20 DAYS UNTIL CHRISTMAS!!!! I am getting excited... are you? As the big day gets closer, I am feverishly trying to finish up my shopping and preparing for the 1000 mile drive to Tennessee! I always enjoy my trips home because I get to spend time with my family and friends...including PAGE! We always have a great time together! I can't wait to see her photography studio now that it's all set up!! : )
(I can't wait for you to get here either!!! AHHH!!! ~Page)
In fact, I had Page's studio on my mind when I came up with today's Crafty Creation :D
(I feel so special! : D )
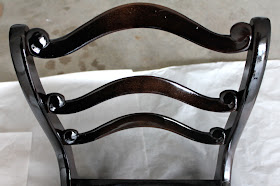
I have been on the lookout for photography props, and one thing that caught my eye was this chair that someone was throwing away.

Floral cushions aren't really my style, and the chair had some damage, but I knew I could easily give this chair a make-over!

First, I needed to take off the cushion. All chairs are slightly different, but my cushion was held in place with a few screws.


Next I ripped off the weird, cross-stitched floral fabric that was held in place with little tacks. Depending on the chair, you could skip this part and just reupholster over the existing fabric. Make sure to remove any staples or tacks that are sticking out.


Under the floral fabric was a red, striped fabric. I decided to not dig any further and left it on. Then, I wiped it down with a damp cloth.

Before painting the chair, I used some fine grain sand paper and smoothed out some of the imperfections. Wipe away any dust, dirt, and grime and you are ready for paint!

I used a high gloss black spray paint. Make sure you spray on thin, even coats of paint, letting the paint dry between coats. This way, you can avoid drips : )
Now, to reupholster the cushion... You can use pretty much any type of fabric. I had some beautiful, iridescent reddish/black fabric left over from some curtains that I made. Make sure your fabric has about 4- 5 inches of overhang on each side. You might want to iron the fabric if it has wrinkles, and spray the fabric with Scotch Guard to repel dirt and stains.
Lay your fabric pretty side down, and place your cushion face down on top of it.

Bring one side of your fabric to the back of the cushion, and secure the fabric in place with some staples.


Now do the sides, making sure to keep the fabric tight so there are no wrinkles on the front.
Once you have all four sides stapled in place--it's time for the corners. Grab the corner fabric and flatten it on the cushion and secure with staples.


I thought this would make a beautiful photography prop! IF I can fit it into my jam packed car, I might donate it to Page's studio when I get to TN :D
*Jes*
(Jes, I can't thank you enough for the chair! I love it and can't wait to see it in person!! It is SO beautiful, and it will definitely be a favorite in my new studio space! You rock! Love you! ~Page)


Stunning! Page is one lucky gal to be getting this work of art :o)
ReplyDeleteI totally agree! : D ~Page
ReplyDeleteI am newly married and my husband and I cannot afford new furniture yet. We were given some old kitchen chairs. We are very thankful for them, but they are quiet ugly! I do believe I am going to paint and upholster them now!
ReplyDelete