Welcome

This blog is about two friends, miles apart, striving to pattern our lives after the Proverbs 31 woman. Here you will find our daily journeys, whether serious, funny, practical, or inventive. Thanks for stopping by and we hope you'll stop by often!

~Lauren & Page

Showing posts with label pumpkins. Show all posts

Friday, November 5, 2010

Home Grown (Hand Sewn) Thanksgiving Pumpkin Patch!

For my thankful challenge today, I am truly thankful for being blessed with a creative mind and skillful hands : ) [Amen to that! : D ~Page]

This craft is so fun and cute. Since your carved pumpkins are now less like their cute original designs and more like a shriveled, rotting "smorgas-gourd" : D, it's time to make some cute pumpkins that will last many, many years!


You'll need:


* Fabric
* Scissors
* Needles and strong thread
* Stuffing (Polyester Fiberfill)
* Coordinating embroidery thread
* Cinnamon Sticks
(I got a bag of 20 sticks in the Christmas craft area at Hobby Lobby for $2!)
* Hot Glue


First, cut your fabric into rectangles. You can make whatever size pumpkins you want, just make sure your rectangles are twice as long as they are tall. I made 3 pumpkins ranging in size and my measurements were:

9 x 18 inches for the large pumpkin
7.5 x 15 inches for the medium pumpkin
6.5 x 13 inches for the smallest pumpkin

Fold your fabric in half, right sides together. Knot your sewing thread, and sew a running stitch along the edge opposite of the fold. Try to make the stitches small and close together. You don't want the stuffing to poke out! End by securing your stitch in place and snipping away the excess thread.


Now knot your thread again and sew a running stitch along an adjacent side. This stitch can be spaced farther apart. DO NOT SECURE YOUR STITCH AND CUT YOUR THREAD YET!


Now, grab a hold of your thread and gently pull. Your stitch should start gathering the fabric. Gather your fabric tightly and then secure your stitch.


Turn your fabric inside out and stuff with stuffing. I ripped open an old pillow and reused it's stuffing... : ) Stuff until the stuffing comes out of the top.


Now knot your thread again and sew a running stitch all the way around the top about a 1/2 inch from the edge.


Once you stitch all the way around, pull your thread and gather the fabric.


Gather tightly and secure your stitch in place.


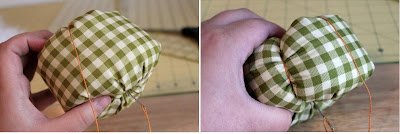
To make this thing look like a pumpkin I created sections with embroidery thread. Thread a long needle with a long piece of embroidery thread and knot the end. Poke your needle through some fabric on the bottom of the pumpkin and up through the top. Bring your needle back to the bottom and poke it through the top again. Pull tightly.


The tighter you keep the thread while creating the sections, the more defined your sections will be. : ) Make as many sections as you want and space them evenly. Secure your stitches when you are done.


I cut out a few little green pumpkin leaves and hot glued them in the center of the top. For the stem of the pumpkin i cut off the end of a cinnamon stick and hot glued it on top of the leaves. I love the swirly cinnamon sticks and the smell they give off!


For the largest pumpkin I glued a few sticks together to make a larger looking stem.


You can also make little curly 'vines' with some beads and wire if you want!


And that's that! : D Try it out and send us some of your designs, and we'll post them on our blog!

*Jes*

Tuesday, October 26, 2010

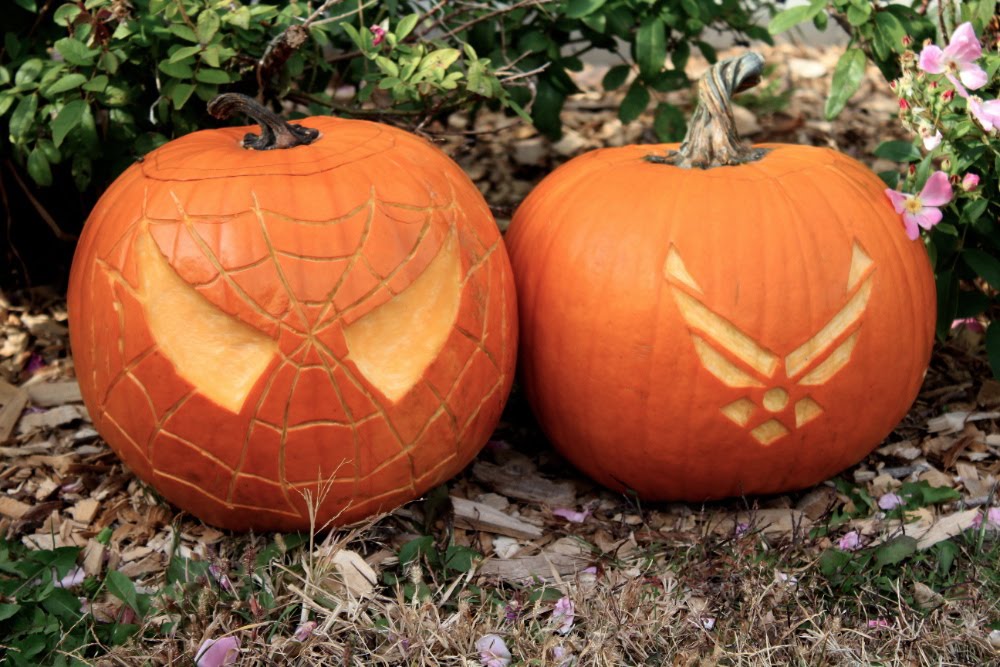
Our Pumpkins! ~Jes

Military families often have to spend holidays apart, but this year--I am lucky enough to have my husband home!

I love being an Air Force Wife, and I am so very proud of my wonderful husband, Sam. So, I decided to light up our front porch this week with the Air Force logo : ) My husband decided to go the nerdier route and chose a Spider-Man themed pumpkin! : D


Instead of carving our pumpkins, we decided to try out a new technique. Using a Speedball Linoleum Cutter, we carved off the top layer of the pumpkin. The Speedball is commonly used in print and stamp making. It has 5 interchangeable carving tips, and you can purchase one at nearly any craft store for around $8.


We started out with cutting the tops off of our pumpkins and cleaning them out.


I sketched out the designs we were going to use and then taped the designs onto the pumpkins. I used a needle quilling tool to poke holes along the lines of the design. You can use any pointy object to do this.


Then we started carving out our design. The deeper you carve, the more the light shines through the walls of your pumpkin.


Since candles need oxygen to stay lit, we cut a hole in the back of our pumpkins to allow oxygen in.


To help our pumpkins last until the end of the month, we rubbed petroleum jelly on the carved parts and inside of the pumpkins.


One pumpkin represents a fictional child-hood hero, and one pumpkin represents a real hero... my hero... my husband : ) I love you, Sam!

*Jes*

Tuesday, October 19, 2010

Carving Pumpkins... With Little Red. : )

This week has been a week!

Photo shoots lining up for the fall...


Because it looks like this at my place... : )

I had my first s'more... Yes. My FIRST s'more.

And, we carved pumpkins!!

This was the first time for Little Red & I! : D It was so much fun!

And this is how it went:


First, get your pumpkins. We chose one for each of us. Come on now--isn't that the cutest, little, tee-tiny pumpkin ever for L.R.? Awww....


Then get your utensils. We didn't go out and get any fancy carving kit or anything... We just used what we had and made the best of it! So here is our hodge-podge of doodads and whatnots... : ) And the pictures of what we wanted to mimic--or stencils, which you can find lots of here!


Next, my big, handsome, hunk of man cut the tops of the pumpkins...


So we could scoop out the "stuff" in the middle.


L.R. thought this was pretty cool...


until daddy scooped the "stuff" out...


and, of course, he wanted to help!


Then, either use your stencil, or freehand your drawing on your pumpkin.


Then start making the cuts!!


I just love what Scott picked for his pumpkin! So him...

At this point, your L.R. helper may get a little bored--and go take a puppy break...


They are so cute together! : D


And this will give you a chance to finish your pumpkin carvings...

And then help out L.R. with his pumpkin...


So cute--just like my Little Red...


See? : )


And here they are on our newly finished front porch... Yeah!!

And then the grand finale!!!!


I had such a blast!!

Already looking forward to next year!!

~Page