

On Friday, I showed you how to make an easy, cute no-sew tutu. This one isn't as easy the first, but don't be intimidated. If you can sew a straight line, you CAN make this tutu!
Here's what you'll need:

* A sewing machine
* Scissors
* 4 continuous yards of tulle
* Ribbon (optional)
* Ruler
* Matching thread
* Pins
* 1/4 wide Elastic
The measurements for this tutu work best for a 3-4 yr old. If you are making an infant's tutu or a tutu for an older child or adult, adjust the measurements appropriately. If you need help deciding the measurements you need, just leave a comment and I'll get back to you : )
For this tutu, I cut my tulle to 4 yards long and 20 inches high.

(Out of 4 yards of tulle, you should be able to make 3 tutus!) Try and be as precise as you can when cutting. An eye for detail will really pay off in the end!
Now it's time to add the ribbon edge. Adding ribbon is an optional step, but I couldn't resist doing it because I found this AWESOME ribbon at Hobby Lobby!

I love me some glitter, but I hate when it rubs off on everything! This ribbon is called "Metallic Velvet" ribbon, and it's found in the fabric section. It looks extremely glittery, but it isn't really glitter, so it doesn't rub off!
In the end, this tutu will have 2 tiers. I sewed the black glittery ribbon on the bottom tier and a white ribbon on the top tier--so I needed 4 yards of each color. Place the ribbon you want on the bottom tier on the edge of the tulle, and stitch in place. Make sure to sew both edges of the ribbon onto the tulle.


When sewing on the top tier ribbon, place it on the opposite side of the tulle and MAKE SURE THAT THE BOTTOM TIER RIBBON IS FACE DOWN! For the white ribbon I used a zig-zag stitch in orange thread to make it more visually interesting.
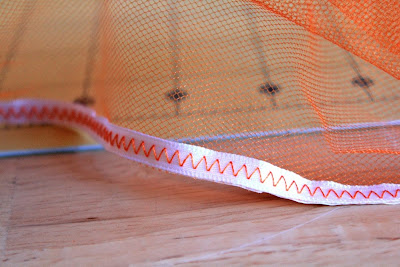
After both sides of your tulle has a ribbon edge, fold the tulle in half so that the top tier is 2 inches shorter than the bottom tier, and pin in place. Both ribbon edges should be pretty side up at this point.

On the folded edge of your tulle, sew a straight stitch a 1/2 inch from the edge. Do this for the entire length of your tulle.

Now it's time to thread our elastic through the seam we just made. An easy way to do this is by attaching a safety pin to the end of your elastic and threading it through the seam until you reach the opening at the end.

Estimate how big you want the elastic waist to be and tie a knot. Snip off the extra elastic.
Adjust the tulle evenly around the elastic and you're done!


I LOVE how the ribbon makes the edges wavy!

I hope this tutorial got you in the Fall mood, because starting tomorrow we are kicking off a week long run of October inspired tutorials! Check in everyday to see what's new!
*Jes*


