Welcome

This blog is about two friends, miles apart, striving to pattern our lives after the Proverbs 31 woman. Here you will find our daily journeys, whether serious, funny, practical, or inventive. Thanks for stopping by and we hope you'll stop by often!

~Lauren & Page

Showing posts with label Fall crafts. Show all posts

Friday, November 19, 2010

Fall Felt Flower Wreath


This will be my last Fall / Thanksgiving crafty creation of 2010! As sad as I am to see this beautiful season pass by so fast, I am super excited to start thinking about Christmas! On December 1st I will be kicking off a week long string of tutorials geared towards December decorating and home-made Christmas gift ideas!

So, the first Giveaway was a success!!!...but it left my door wreath-less :/ With thanksgiving just 1 week away, I needed another wreath! Here are the materials I needed for this crafty creation :


* A wreath
- I bought a straw wreath from Hobby Lobby but you can re-purpose an old wreath like we did in our October Wreath Tutorial found HERE
* Yarn
* Different colors of felt
- Felt is really cheap @ 4 squares for $1 at most craft stores!!!
* Hot glue gun
* scissors
* Pencil
* Piece of paper
* A decorative craft stem....We'll get to that later : )

First, I wrapped my wreath with yarn. Secure your yarn on the back of the wreath with a bit of hot glue and start wrapping. This took a while, so I caught up on the news while I wrapped : )


After the entire wreath is wrapped, hot glue the end of the yard to the back of the wreath.


For the felt flowers, I started by drawing a petal shape onto a piece of paper, and then I cut it out.


Place your petal template on top of a piece of felt and cut around it. Cut out 5 petals.


Now on your template draw a smaller petal inside of the large petal shape and cut it out.


Using the smaller petal shape cut out 5 more petals in a coordinating color of felt.


Place a line of hot glue on the back of one of the smaller petals and place it on top of a larger petal.


Before the glue hardens, quickly fold the petal in half and hold in that position for a few seconds while the glue sets. Your petal should have a little more shape to it and look a little more 3 dimensional.


Next I cut off the ends of the petals.


Cut a small circle out of the same color felt as your big petal and start hot glueing the petals into the center.


When you are done your flower should look something like this.


For the center of the flowers, I bought a decorative Christmas stem from the Christmas section of Hobby Lobby. It was 1/2 off and cost about .50!


I cut off a ball and hot glued it the center of the flower.


I made 5 flowers in all, varying up the colors and sizes of petals. You can make more or less depending on how you want your wreath to look.


All that's left to do is position the flowers onto your wreath and hot glue into place!


All together the wreath cost less than $6 to make! Here is a break down of the costs:

Wreath - $1.75
Yarn - $2.30
Felt - $1
Decorative Stem - $0.50

This proves you don't have to spend a fortune to make beautiful decorations! I always shop sales and use coupons to get the most bang for my buck. Make sure to check in next Teusday because I will be blogging about where I shop for all my supplies and how I get my coupons! I will also give you a sneak peak into my workspace where all of the Crafty Creations are made!

*Jes*

Friday, November 5, 2010

Home Grown (Hand Sewn) Thanksgiving Pumpkin Patch!

For my thankful challenge today, I am truly thankful for being blessed with a creative mind and skillful hands : ) [Amen to that! : D ~Page]

This craft is so fun and cute. Since your carved pumpkins are now less like their cute original designs and more like a shriveled, rotting "smorgas-gourd" : D, it's time to make some cute pumpkins that will last many, many years!


You'll need:


* Fabric
* Scissors
* Needles and strong thread
* Stuffing (Polyester Fiberfill)
* Coordinating embroidery thread
* Cinnamon Sticks
(I got a bag of 20 sticks in the Christmas craft area at Hobby Lobby for $2!)
* Hot Glue


First, cut your fabric into rectangles. You can make whatever size pumpkins you want, just make sure your rectangles are twice as long as they are tall. I made 3 pumpkins ranging in size and my measurements were:

9 x 18 inches for the large pumpkin
7.5 x 15 inches for the medium pumpkin
6.5 x 13 inches for the smallest pumpkin

Fold your fabric in half, right sides together. Knot your sewing thread, and sew a running stitch along the edge opposite of the fold. Try to make the stitches small and close together. You don't want the stuffing to poke out! End by securing your stitch in place and snipping away the excess thread.


Now knot your thread again and sew a running stitch along an adjacent side. This stitch can be spaced farther apart. DO NOT SECURE YOUR STITCH AND CUT YOUR THREAD YET!


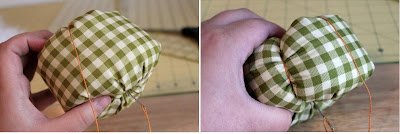
Now, grab a hold of your thread and gently pull. Your stitch should start gathering the fabric. Gather your fabric tightly and then secure your stitch.


Turn your fabric inside out and stuff with stuffing. I ripped open an old pillow and reused it's stuffing... : ) Stuff until the stuffing comes out of the top.


Now knot your thread again and sew a running stitch all the way around the top about a 1/2 inch from the edge.


Once you stitch all the way around, pull your thread and gather the fabric.


Gather tightly and secure your stitch in place.


To make this thing look like a pumpkin I created sections with embroidery thread. Thread a long needle with a long piece of embroidery thread and knot the end. Poke your needle through some fabric on the bottom of the pumpkin and up through the top. Bring your needle back to the bottom and poke it through the top again. Pull tightly.


The tighter you keep the thread while creating the sections, the more defined your sections will be. : ) Make as many sections as you want and space them evenly. Secure your stitches when you are done.


I cut out a few little green pumpkin leaves and hot glued them in the center of the top. For the stem of the pumpkin i cut off the end of a cinnamon stick and hot glued it on top of the leaves. I love the swirly cinnamon sticks and the smell they give off!


For the largest pumpkin I glued a few sticks together to make a larger looking stem.


You can also make little curly 'vines' with some beads and wire if you want!


And that's that! : D Try it out and send us some of your designs, and we'll post them on our blog!

*Jes*

Friday, October 29, 2010

Goodness, Gracious, Great Balls of FABRIC!

Decorative balls are so popular right now... And for a good reason--they are so cute!! There are so many different kinds, to match ANY home decor--but have you priced these bad boys?!?!? Let's just say, $$$. So, here's AP31's best crafter ever to the rescue, with just one example of how to make your own for ¢ !! : )


I love to repurpose stuff! It's a great challenge! I am lucky enough to have some great thrift stores in my area, but by far my favorite is the Goodwill Last Chance Warehouse! They sell stuff by the pound, and the more you buy, the cheaper it is! I seriously LOVE this place. I went there the other day and picked up these 10 shirts for under $5!!! I decided to rip them up and make decorative rag balls out of them : )


To do this project you'll need :
* New or repurposed fabric
* Scissors
* String
* Hot Glue Gun

First, anytime you repurpose fabric, make sure you WASH IT FIRST! 'Cause you just never know... ;P

After they're clean and dried, cut the back panels out of the shirts and rip off thin, long strips. To rip fabric, make a small cut with your scissors first, then grab each side and RIP! (I find this VERY enjoyable...) Remove any loose threads.


My strips were about 1/2 inch thick.


For the ball, I cut up t-shirts and balled some fabric up in my hand. I secured everything in place by wrapping some string around the ball. Try to make it as round as possible.


Instead of balling up fabric, you can use styrofoam balls--but for me, the purpose of this craft was to re-purpose! : )


Next I started wrapping the strips I ripped around the ball. Hot glue the end of a strip to the ball and tightly wrap until you reach the end of the strip and hot glue that end in place.


Continue wrapping with new strips until your whole ball is covered.


The flannel prints reminded me of Fall!


This craft can be done in ANY fabric. Choose any theme or color scheme, and use your imagination!


Send us some pictures and we'll host them on the blog! Can't wait to see your designs!

*Jes*