Welcome

This blog is about two friends, miles apart, striving to pattern our lives after the Proverbs 31 woman. Here you will find our daily journeys, whether serious, funny, practical, or inventive. Thanks for stopping by and we hope you'll stop by often!

~Lauren & Page

Showing posts with label organization. Show all posts

Tuesday, November 23, 2010

The Home of Crafty Creations! : D

I have been posting Crafty Creations for a while now and, if you haven't noticed, I have my hands in just about every type of craft imaginable! That means I have A LOT of doo-dads and what-nots to organize and store. I decided to give you a small glimpse into my workspace and share some craft and organization related tips that have helped me stay sane : ) I live in a 2 bedroom house, and one of those bedrooms I have turned into my craft/work room.


Okay...so it's not that impressive, but I try hard to keep it organized and somewhat manageable : ) Not only is this where all of the Crafty Creations are born, it is where I run my small home business!


Since the room is quite small, I have to make the most of each square inch. I don't have enough floor space to have traditional shelving so I opted for wire shelving that you install onto your walls. It doesn't take up any floor space and you can easily rearrange the shelves any time you want! I bought my shelving in a kit at Lowe's, but you can also find this kind of shelving at Walmart and Target.


Since I mostly sew, I have tons of fabric and thread. I keep my fabric on the wire shelving and I keep my thread on thread racks next to my sewing machine. Thread racks can be found at most fabric stores and are totally worth the $ if you have tons of thread like me.


I also store my bobbin thread in a bobbin thread box that has a lid. My mother-in-law just told me about another ingenious way to store bobbins....Toe separators! Toe separators are used to separate your toes during a pedicure. They are dirt cheap and will keep your threads from unraveling! Thanks for the idea, Becky!


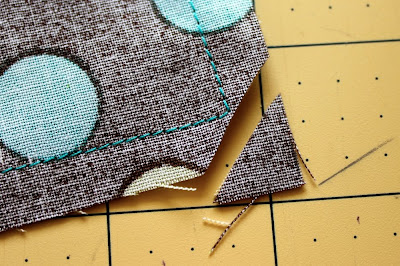
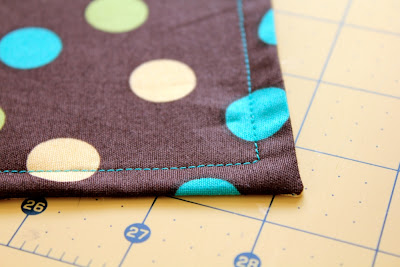
This table is where all the crafts are made and where all my sewing is done. In the background of most of my tutorial pics, you will often see the yellow mat that is laying on the table. It is a self healing cutting mat and it keeps my table from getting cut up when I use my rotary cutter.


The measurement guides up the sides of the mat are also helpful! I also use clear measuring rulers. They are meant for quilting, but they are dead useful in just general sewing. Be careful when choosing your rulers. Some brands have measurement marks that eventually rub off. I like Omnigrid brand. Their marks are engraved into the plastic so it will never fade or disappear.


Underneath the table is where I keep all of my scrap fabric. I never ever throw away scrap fabric because there are soooo many thing you can make with scraps!


As for my pins and needles, I store them on a magnetic thingy I found at the dollar store. Anything with a strong magnetic surface will work.


I also have a metal board on my wall that holds tins with a magnetic bottom. These are great for storing beads and other small items.


Another option for storing small items is compartmentalized plastic bins. This one is from ARTBIN and I got it from Joann's Fabric store. They stack nicely and you can adjust the compartment walls
to fit your needs.


When purchasing ribbon you can buy it by the roll or by the yard. If you purchase it buy the yard, ask the person cutting the ribbon if she has any empty ribbon spools she plans on throwing away. After having your ribbon cut you can roll the ribbon on the spool and store it neatly until you are ready to use it.


I didn't acquire all of this stuff overnight : ) I am very patient and wait for good sales to roll along! The stores that I shop at most often are Hobby Lobby, Michael's, Hancock Fabrics, and Joann Fabrics. They all have great sales and even better coupons! If you go to their websites, you can view the week's sales flyer's and sign up for e-mails. Their e-mails often send you bonus coupons and give you a heads up on big sales coming your way! If you don't feel like pursuing all of the different sites for coupons, you can go to http://www.mycraftcoupons.com/ . They do a good job of posting all of the current craft coupons for many different craft stores.

I hope this post has given you some useful tips and good ideas :) With Christmas season practically here, it's more important than ever to stay organized! Speaking of Christmas... I can't wait to show you all of the Christmas Crafty Creations I have coming your way! Check in this Friday for a tutorial geared towards the furrier family members in your home... And, also make sure to keep checking in because, starting December 1st, we are kicking off a week long string of tutorials geared towards Christmas decorating and gift giving! Yeah!

If YOU have any great tips or tricks to stay organized, we'd love to hear them! Leave a comment below, and maybe we'll post your idea on the blog!

*Jes*

Friday, September 17, 2010

Crafty Organizer


I try to dabble in all forms of art. You'll see this come through in my craft tutorials : ) Switching it up keeps me interested and creative! Having tons of hobbies means having tons of supplies and lots of little do-dads. Staying organized and protecting my investments are important to me. I have bought many things to keep me organized, but sometimes I have to get imaginative when coming up with solutions on how to store my stuff. I recently invested in some nice paint brushes and needed a way to store them. I came up with a cute but functional answer to my problem. I call it my 'paint brush roll''! Below is how you make it.


Materials Needed :
* 2 Coordinating Fabrics ( at least 18 x 18 inches of each)
* 30 inches of Ribbon or Twill Tape
* Matching Thread
* Pins
* Scissors
* Ruler
* Pencil
* Sewing Machine
* Iron
* Your paintbrushes for sizing

Instructions :

1.) Cut a 18 x 18 inch square out of each of your fabrics

2.) Lay one on top of the other, pretty sides facing each other, and pin together


3.) Sew along each side with a 1/2 seam allowance, leaving about a 2 inch opening on one side. Make sure to backstitch on each side of the opening!


4.) Clip all four corners making sure not to cut your stitches. By cutting your corners you are eliminating a lot of bulk.

5.) Turn inside out through the 2 inch hole you left. Use a pointy object, like the handle of one of your paintbrushes, to poke out your corners


6.) Iron and topstitch all four sides with a 1/2 inch seam allowance. I topstitch everything! I think it really adds a finished look to every sewing project. Plus, it closes up the hole you used to turn your fabric inside out!


7.) With the fabric you want for the inside facing up, measure 5 inches up from the bottom and lightly draw a line all the way across. Fold on the line and pin your fabric down. Iron your crease. Sew where your topstitch is on each side of the pocket you just created.


8.) Now it's time to sew the individual pockets that will hold each of your brushes. I start off by drawing the middle line. If you used the measurements I gave, the middle should be at 8.5 inches along the bottom. Lightly draw a line from the bottom to the top of your pocket, no further. Since my brush handles vary in width, I make larger pockets in the middle and smaller pockets towards the sides. You can follow my measurements or come up with your own. 1.25 inch wide pockets should be wide enough to fit your largest brush. From the middle line you just drew, make another line 1.25 inches away. Do this on both sides of your middle line. Keep drawing lines on both sides until you reach the end. See the picture to see the widths of the lines I made.


9.) Sew along the lines making sure to backstitch at the beginning and end of each line.

10.) Now we are going to make a flap that folds down and covers your brush bristles. Find your tallest brush and place it into one of the pockets. Mark a horizontal line about 1/2 inch above your brush. Fold on the line, pin and iron. Sew a 1/8 inch seam across the top.


11.) Almost done!! Now we need to add the ribbon or twill tape to the middle of the right side. Find the middle of the right side and make a small mark. Cut your ribbon to 30 inches long and, if it is a synthetic material, singe the ends so that it does not unravel. You can do this by holding the ends up to a flame. Be careful not to get to close! You are trying to melt the ends, not catch them on fire : ) Measure 13 inches of ribbon and fold. One side of the ribbon needs to be longer than the other so that after you roll up your brushes, you can wrap the longer ribbon around the bundle once and then make a bow. place the fold in the ribbon over the mark you just made and sew the ribbon on.


Ta Da!!! You can also store your make-up in it! Customize the widths of your pockets to fit your foundations brushes, eyeliner, mascara, and more! Also, if you stop after Step #5, you can fill your square with stuffing and make a pillow! After stuffing, just stitch shut your opening!

In addition, if you stop after Step #6 you have your very own fabric napkins...or place mats!!! **This brings me to a shortcut you can take for this project. Most department stores sell fabric place mats. They are usually 18 x 18 inches. If you find a place mat you want to use for this project, you can skip Steps 1 - 6!

Have fun and be creative! The possibilities with this project are endless !!!!

*Jes*