

I try to dabble in all forms of art. You'll see this come through in my craft tutorials : ) Switching it up keeps me interested and creative! Having tons of hobbies means having tons of supplies and lots of little do-dads. Staying organized and protecting my investments are important to me. I have bought many things to keep me organized, but sometimes I have to get imaginative when coming up with solutions on how to store my stuff. I recently invested in some nice paint brushes and needed a way to store them. I came up with a cute but functional answer to my problem. I call it my 'paint brush roll''! Below is how you make it.
 Materials Needed :
 * 2 Coordinating Fabrics ( at least 18 x 18 inches of each)
* 30 inches of Ribbon or Twill Tape
* Matching Thread
* Pins
* Scissors
* Ruler
* Pencil
* Sewing Machine
* Iron
* Your paintbrushes for sizing
Instructions :
1.) Cut a 18 x 18 inch square out of each of your fabrics
2.) Lay one on top of the other, pretty sides facing each other, and pin together

3.) Sew along each side with a 1/2 seam allowance, leaving about a 2 inch opening on one side. Make sure to backstitch on each side of the opening!


4.) Clip all four corners making sure not to cut your stitches. By cutting your corners you are eliminating a lot of bulk.
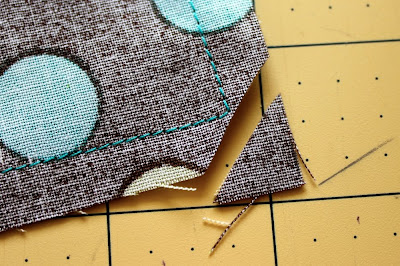
5.) Turn inside out through the 2 inch hole you left. Use a pointy object, like the handle of one of your paintbrushes, to poke out your corners

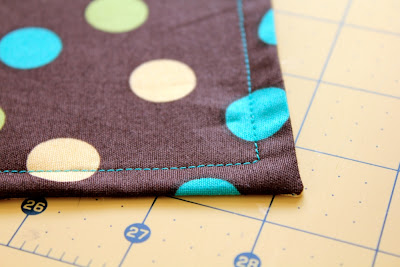
6.) Iron and topstitch all four sides with a 1/2 inch seam allowance. I topstitch everything! I think it really adds a finished look to every sewing project. Plus, it closes up the hole you used to turn your fabric inside out!
7.) With the fabric you want for the inside facing up, measure 5 inches up from the bottom and lightly draw a line all the way across. Fold on the line and pin your fabric down. Iron your crease. Sew where your topstitch is on each side of the pocket you just created.

8.) Now it's time to sew the individual pockets that will hold each of your brushes. I start off by drawing the middle line. If you used the measurements I gave, the middle should be at 8.5 inches along the bottom. Lightly draw a line from the bottom to the top of your pocket, no further. Since my brush handles vary in width, I make larger pockets in the middle and smaller pockets towards the sides. You can follow my measurements or come up with your own. 1.25 inch wide pockets should be wide enough to fit your largest brush. From the middle line you just drew, make another line 1.25 inches away. Do this on both sides of your middle line. Keep drawing lines on both sides until you reach the end. See the picture to see the widths of the lines I made.

9.) Sew along the lines making sure to backstitch at the beginning and end of each line.
10.) Now we are going to make a flap that folds down and covers your brush bristles. Find your tallest brush and place it into one of the pockets. Mark a horizontal line about 1/2 inch above your brush. Fold on the line, pin and iron. Sew a 1/8 inch seam across the top.

11.) Almost done!! Now we need to add the ribbon or twill tape to the middle of the right side. Find the middle of the right side and make a small mark. Cut your ribbon to 30 inches long and, if it is a synthetic material, singe the ends so that it does not unravel. You can do this by holding the ends up to a flame. Be careful not to get to close! You are trying to melt the ends, not catch them on fire : ) Measure 13 inches of ribbon and fold. One side of the ribbon needs to be longer than the other so that after you roll up your brushes, you can wrap the longer ribbon around the bundle once and then make a bow. place the fold in the ribbon over the mark you just made and sew the ribbon on.

Ta Da!!! You can also store your make-up in it! Customize the widths of your pockets to fit your foundations brushes, eyeliner, mascara, and more! Also, if you stop after Step #5, you can fill your square with stuffing and make a pillow! After stuffing, just stitch shut your opening!
In addition, if you stop after Step #6 you have your very own fabric napkins...or place mats!!! **This brings me to a shortcut you can take for this project. Most department stores sell fabric place mats. They are usually 18 x 18 inches. If you find a place mat you want to use for this project, you can skip Steps 1 - 6!
Have fun and be creative! The possibilities with this project are endless !!!!
*Jes*
No comments:
Post a Comment