
There are no two photographs alike. Each photo tells a different story and is unique. So why frame these photos in boring, mass produced picture frames? Why not have a frame as unique as the picture it holds? In today's tutorial I will show you two ways to upgrade a picture frame. The first technique using fabric and the second using scrapbook paper.
Fabric Covered Mat

For this tutorial you will need:
* A picture frame. You can use one you already have, or you can purchase one.
(As long as it has a mat it will work.)
* Fabric that compliments the photo you will be using.
(My frame has a double mat, so I have chosen two fabrics, one for each mat.)
* Tacky Glue
* Paint Brush
* Scissors
1.) First, take the mat out of your frame.
2.) Paint on a thin layer of tacky glue on the front side of the mat. Make sure not to glop too much on because you don't wan't it to soak through your fabric.


3.) Lay your mat sticky side down onto your chosen fabric and cut around it leaving enough fabric to fold over the edge to glue. For me 3/4 inch worked best.


4.) Snip off all 4 outside corners
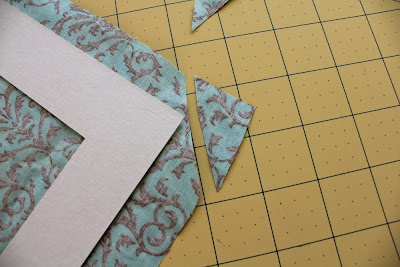
5.) Cut out the inside leaving the same amount of fabric as you left on the outside.
From the inside hole, cut the fabric corners up to the mat.


6.) Paint a thin layer af tacky glue on the back side of your mat and gently pull the fabric taught and place on top of the glue. Do this for the outside and the inside. Apply more glue if necessary.


7.) Let glue dry and your done! This is what it should look like :


Reconstruct your picture frame and marvel at the beauty! : )


Simple and cost effective--yet so gorgeous!
Scrapbook Paper Covered Mat
Another easy way to customize a picture frame is with scrapbook paper. For this project I used a wooden frame I found at Micheal's for $1!!!!

They have different shapes, but this one was my favorite.
For this tutorial you will need:

* 1 piece of scrapbook paper bigger than your frame
* Tacky Glue
* Paint brush
* Paint
( You can buy a small bottle of paint at any craft store for $.50)
* An x-acto knife
1.) Paint the inside and outside edges of your frame and let dry. You can also paint the back if you want.

2.) Paint a thin layer of tacky glue on the front of your frame and place the frame sticky side down onto the back side of your scrapbook paper. You may want figure out the placement you prefer before gluing. Let dry.
3.) With a sharp x-acto knife, carefully cut around the inside and outside of your frame.

Wasn't that easy! And cheap, coming in at a total cost of less than $2!

The possibilities are endless... From cutsie sweet to designer chic--you pick!
Hope you enjoyed this frame upgrade! Try it out and send us some pictures! We would love to see them!
*Jes*
No comments:
Post a Comment