Welcome

This blog is about two friends, miles apart, striving to pattern our lives after the Proverbs 31 woman. Here you will find our daily journeys, whether serious, funny, practical, or inventive. Thanks for stopping by and we hope you'll stop by often!

~Lauren & Page

Showing posts with label handmade. Show all posts

Friday, November 5, 2010

Home Grown (Hand Sewn) Thanksgiving Pumpkin Patch!

For my thankful challenge today, I am truly thankful for being blessed with a creative mind and skillful hands : ) [Amen to that! : D ~Page]

This craft is so fun and cute. Since your carved pumpkins are now less like their cute original designs and more like a shriveled, rotting "smorgas-gourd" : D, it's time to make some cute pumpkins that will last many, many years!


You'll need:


* Fabric
* Scissors
* Needles and strong thread
* Stuffing (Polyester Fiberfill)
* Coordinating embroidery thread
* Cinnamon Sticks
(I got a bag of 20 sticks in the Christmas craft area at Hobby Lobby for $2!)
* Hot Glue


First, cut your fabric into rectangles. You can make whatever size pumpkins you want, just make sure your rectangles are twice as long as they are tall. I made 3 pumpkins ranging in size and my measurements were:

9 x 18 inches for the large pumpkin
7.5 x 15 inches for the medium pumpkin
6.5 x 13 inches for the smallest pumpkin

Fold your fabric in half, right sides together. Knot your sewing thread, and sew a running stitch along the edge opposite of the fold. Try to make the stitches small and close together. You don't want the stuffing to poke out! End by securing your stitch in place and snipping away the excess thread.


Now knot your thread again and sew a running stitch along an adjacent side. This stitch can be spaced farther apart. DO NOT SECURE YOUR STITCH AND CUT YOUR THREAD YET!


Now, grab a hold of your thread and gently pull. Your stitch should start gathering the fabric. Gather your fabric tightly and then secure your stitch.


Turn your fabric inside out and stuff with stuffing. I ripped open an old pillow and reused it's stuffing... : ) Stuff until the stuffing comes out of the top.


Now knot your thread again and sew a running stitch all the way around the top about a 1/2 inch from the edge.


Once you stitch all the way around, pull your thread and gather the fabric.


Gather tightly and secure your stitch in place.


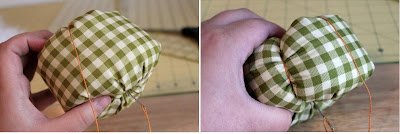
To make this thing look like a pumpkin I created sections with embroidery thread. Thread a long needle with a long piece of embroidery thread and knot the end. Poke your needle through some fabric on the bottom of the pumpkin and up through the top. Bring your needle back to the bottom and poke it through the top again. Pull tightly.


The tighter you keep the thread while creating the sections, the more defined your sections will be. : ) Make as many sections as you want and space them evenly. Secure your stitches when you are done.


I cut out a few little green pumpkin leaves and hot glued them in the center of the top. For the stem of the pumpkin i cut off the end of a cinnamon stick and hot glued it on top of the leaves. I love the swirly cinnamon sticks and the smell they give off!


For the largest pumpkin I glued a few sticks together to make a larger looking stem.


You can also make little curly 'vines' with some beads and wire if you want!


And that's that! : D Try it out and send us some of your designs, and we'll post them on our blog!

*Jes*

Friday, October 29, 2010

Goodness, Gracious, Great Balls of FABRIC!

Decorative balls are so popular right now... And for a good reason--they are so cute!! There are so many different kinds, to match ANY home decor--but have you priced these bad boys?!?!? Let's just say, $$$. So, here's AP31's best crafter ever to the rescue, with just one example of how to make your own for ¢ !! : )


I love to repurpose stuff! It's a great challenge! I am lucky enough to have some great thrift stores in my area, but by far my favorite is the Goodwill Last Chance Warehouse! They sell stuff by the pound, and the more you buy, the cheaper it is! I seriously LOVE this place. I went there the other day and picked up these 10 shirts for under $5!!! I decided to rip them up and make decorative rag balls out of them : )


To do this project you'll need :
* New or repurposed fabric
* Scissors
* String
* Hot Glue Gun

First, anytime you repurpose fabric, make sure you WASH IT FIRST! 'Cause you just never know... ;P

After they're clean and dried, cut the back panels out of the shirts and rip off thin, long strips. To rip fabric, make a small cut with your scissors first, then grab each side and RIP! (I find this VERY enjoyable...) Remove any loose threads.


My strips were about 1/2 inch thick.


For the ball, I cut up t-shirts and balled some fabric up in my hand. I secured everything in place by wrapping some string around the ball. Try to make it as round as possible.


Instead of balling up fabric, you can use styrofoam balls--but for me, the purpose of this craft was to re-purpose! : )


Next I started wrapping the strips I ripped around the ball. Hot glue the end of a strip to the ball and tightly wrap until you reach the end of the strip and hot glue that end in place.


Continue wrapping with new strips until your whole ball is covered.


The flannel prints reminded me of Fall!


This craft can be done in ANY fabric. Choose any theme or color scheme, and use your imagination!


Send us some pictures and we'll host them on the blog! Can't wait to see your designs!

*Jes*

Tuesday, October 12, 2010

October Wreath Tutorial


Ok... I'm nuts about this wreath that Jes made! It's so me... Wonder if I can bribe her out of it? : ) I just love all of the crafts she makes--and always look forward to what she sends me! Thank you so much, Jes!! ~Page


Fall is by far my favorite time of the year! Pumpkin pie, the smell of cinnamon, beautiful leaves, hoodies, dead bugs...YAY! My husband and I just moved into a new house, so I have been getting into the decorating mood... I rarely purchase decorations, because I would rather make them and have something unique that no one else has! I decided to make a October wreath to hang on our door yesterday, and I thought would share the process with you!

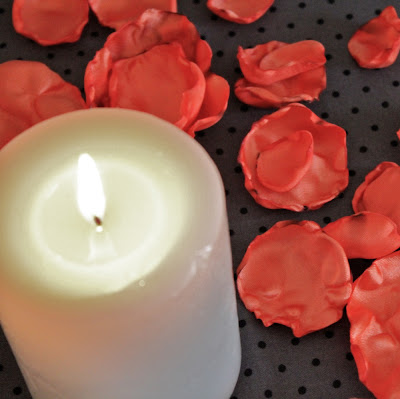
I started out by making some Burnt Flowers. You can learn how to make these by reading an earlier tutorial Lauren posted HERE.


I even made some flowers to put at the base of my candle!


To make my wreath I started out with a vine wreath that I found at the dollar store for $1!

Any old wreath can be repurposed for this project. Just tear off the dusty embellishments it already has on it and your ready to go!


My wreath was a little skinny for my taste, so I cut up strips of an old blanket and wrapped it around the wreath hot glueing it into place.


Next, I tore 2 inch strips of fabric. I really like the look of the frayed edges tearing fabric gives me. Most cotton fabric should tear easily.


Decide which side of your wreath is going to be the front and which is going to be the back. You should always start and end strips of fabric on the back side.

I hot glued on the first strip of fabric and starting wrapping it tightly around the wreath. Make sure that you maintain the width of your spacing as you wrap.


As you come to the end of a strip of fabric, hot glue on the back and glue a new strip where the last on ended. Continue wrapping until the entire wreath is covered.


Now you can embellish however you like! I hot glued my burnt flowers onto the wreath and then glued some beautiful, black ostrich feathers underneath the flowers!

I encourage you to make your own decorations, whatever the season is! Incorporate the things you like to make meaningful and unique decor!


Send in your creations for a chance to get it posted on our blog for others to see!! Can't wait to see them!!

Enjoy!

*Jes*

Friday, September 10, 2010

Fabulous Frame Upgrades!


There are no two photographs alike. Each photo tells a different story and is unique. So why frame these photos in boring, mass produced picture frames? Why not have a frame as unique as the picture it holds? In today's tutorial I will show you two ways to upgrade a picture frame. The first technique using fabric and the second using scrapbook paper.

Fabric Covered Mat


For this tutorial you will need:

* A picture frame. You can use one you already have, or you can purchase one.
(As long as it has a mat it will work.)
* Fabric that compliments the photo you will be using.
(My frame has a double mat, so I have chosen two fabrics, one for each mat.)
* Tacky Glue
* Paint Brush
* Scissors


1.) First, take the mat out of your frame.

2.) Paint on a thin layer of tacky glue on the front side of the mat. Make sure not to glop too much on because you don't wan't it to soak through your fabric.


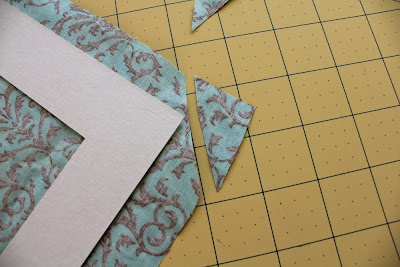
3.) Lay your mat sticky side down onto your chosen fabric and cut around it leaving enough fabric to fold over the edge to glue. For me 3/4 inch worked best.


4.) Snip off all 4 outside corners


5.) Cut out the inside leaving the same amount of fabric as you left on the outside.
From the inside hole, cut the fabric corners up to the mat.


6.) Paint a thin layer af tacky glue on the back side of your mat and gently pull the fabric taught and place on top of the glue. Do this for the outside and the inside. Apply more glue if necessary.


7.) Let glue dry and your done! This is what it should look like :


Reconstruct your picture frame and marvel at the beauty! : )


Simple and cost effective--yet so gorgeous!

Scrapbook Paper Covered Mat

Another easy way to customize a picture frame is with scrapbook paper. For this project I used a wooden frame I found at Micheal's for $1!!!!


They have different shapes, but this one was my favorite.

For this tutorial you will need:


* 1 piece of scrapbook paper bigger than your frame
* Tacky Glue
* Paint brush
* Paint
( You can buy a small bottle of paint at any craft store for $.50)
* An x-acto knife

1.) Paint the inside and outside edges of your frame and let dry. You can also paint the back if you want.


2.) Paint a thin layer of tacky glue on the front of your frame and place the frame sticky side down onto the back side of your scrapbook paper. You may want figure out the placement you prefer before gluing. Let dry.

3.) With a sharp x-acto knife, carefully cut around the inside and outside of your frame.


Wasn't that easy! And cheap, coming in at a total cost of less than $2!


The possibilities are endless... From cutsie sweet to designer chic--you pick!

Hope you enjoyed this frame upgrade! Try it out and send us some pictures! We would love to see them!

*Jes*