For my thankful challenge today, I am truly thankful for being blessed with a creative mind and skillful hands : ) [Amen to that! : D ~Page]
This craft is so fun and cute. Since your carved pumpkins are now less like their cute original designs and more like a shriveled, rotting "smorgas-gourd" : D, it's time to make some cute pumpkins that will last many, many years!

You'll need:


* Fabric
* Scissors
* Needles and strong thread
* Stuffing (Polyester Fiberfill)
* Coordinating embroidery thread
* Cinnamon Sticks
(I got a bag of 20 sticks in the Christmas craft area at Hobby Lobby for $2!)
* Hot Glue

First, cut your fabric into rectangles. You can make whatever size pumpkins you want, just make sure your rectangles are twice as long as they are tall. I made 3 pumpkins ranging in size and my measurements were:
9 x 18 inches for the large pumpkin
7.5 x 15 inches for the medium pumpkin
6.5 x 13 inches for the smallest pumpkin
Fold your fabric in half, right sides together. Knot your sewing thread, and sew a running stitch along the edge opposite of the fold. Try to make the stitches small and close together. You don't want the stuffing to poke out! End by securing your stitch in place and snipping away the excess thread.


Now knot your thread again and sew a running stitch along an adjacent side. This stitch can be spaced farther apart. DO NOT SECURE YOUR STITCH AND CUT YOUR THREAD YET!
Now, grab a hold of your thread and gently pull. Your stitch should start gathering the fabric. Gather your fabric tightly and then secure your stitch.
Turn your fabric inside out and stuff with stuffing. I ripped open an old pillow and reused it's stuffing... : ) Stuff until the stuffing comes out of the top.
Now knot your thread again and sew a running stitch all the way around the top about a 1/2 inch from the edge.
Once you stitch all the way around, pull your thread and gather the fabric.
Gather tightly and secure your stitch in place.
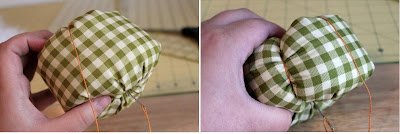
To make this thing look like a pumpkin I created sections with embroidery thread. Thread a long needle with a long piece of embroidery thread and knot the end. Poke your needle through some fabric on the bottom of the pumpkin and up through the top. Bring your needle back to the bottom and poke it through the top again. Pull tightly.
The tighter you keep the thread while creating the sections, the more defined your sections will be. : ) Make as many sections as you want and space them evenly. Secure your stitches when you are done.
I cut out a few little green pumpkin leaves and hot glued them in the center of the top. For the stem of the pumpkin i cut off the end of a cinnamon stick and hot glued it on top of the leaves. I love the swirly cinnamon sticks and the smell they give off!
For the largest pumpkin I glued a few sticks together to make a larger looking stem.
You can also make little curly 'vines' with some beads and wire if you want!


The cinnamon sticks were a great idea! I can't wait to see what you guys come up with for the Christmas season. Keep up the good work, girls!!!
ReplyDelete